

navbar
Saturday, November 30, 2013
Yet another bottle brush tree deer scene!
I told you, I can't help myself. I really really can't. This is the most simple one I have done so far. All of the things are just items I purchased from Michael's and hot glued on! (actually the house is from Target). And it's perfect for my living room ;)

Wednesday, November 27, 2013
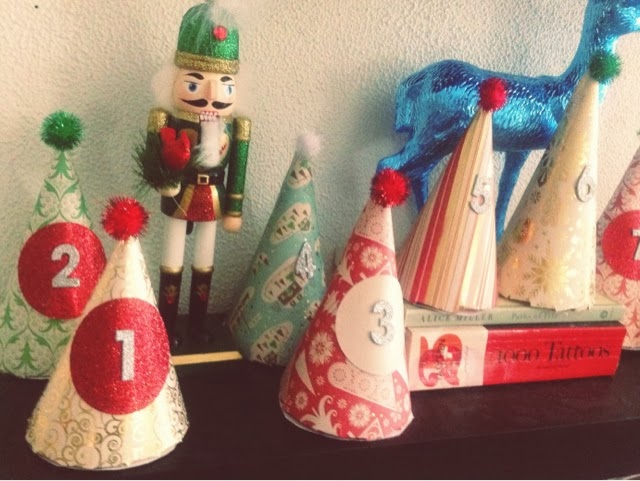
DIY Tree Advent Calendar

So I was on the hunt for inspiration for an advent calendar. I knew I wanted to make some sort of tree out of card stock and couldn't recall ever seeing anyone do this...So one night I was just going through diy pics online and I came across a card stock tree tutorial. And here I thought I was coming up with this on my own!! I mean how is anything ever original with the internet these days? Haa!! I have done that with a few things in life actually. Most note worthy is a "long hair don't care" tee shirt. Yeah, I 100% without a doubt thought I was onto to something. Went to google, nope, about 500 people were already on that. I can't! This is real life guys. Like it really happened.But anyway, this tutorial is great. And even though I really thought I was onto something, I WAS glad I didn't have to make the templates myself :)
Templates are small, medium and large
I used all three templates. All you need are the templates, glue gun, card stock (I bought a holiday book from Michael's), some Pom poms, numbers (optional) and treats to put inside!!! I am so excited to get back from this trip so the girls can start opening them!!!


Tuesday, November 26, 2013
My winter night time look

DIY Letter

We have a goldish/bronze letter "H" from Hobby Lobby that we keep up all year round. It's a good one. If you are looking for a nice surname letter, I totally recommend…actually we have the same "P" one in Priscilla's room as well, but I really wanted to make a fancy holiday "H". I went to Michael's and went straight to the wooden letter section. I picked out the white one, it's the biggest. (at my Michael's at least). I bought gold spray paint, so that if there was space in between the decoration, you wouldn't see the white in the back ground. I went to the holiday aisle where they have loose bundles of holiday berries. (I am pretty sure that's what they are supposed to be, ha!!) I picked out the colors I wanted to go with….golds. You could really do your letter in any color and it would look nice. The reds would look good, green or even all different colors would look awesome. I would recommend getting them while a sale is going on. Mine were half price when I got them, and I needed a lot. So if you don't get a deal, it could be a pricier craft. All together this craft was around $25.00.
You need:
~ large letter
~glue gun
~ spray paint/acrylic paint (I was just being lazy. Acrylic is definitely cheaper)
~ holiday berries/balls
After I painted the H and was waiting for it to dry, I started popping the berries off of the metal stems and collected them in a bowl. When the paint was dry, I started glueing them on. I started with the outline of the H and then filled the inside. I am glad I choose a few different sizes of berries, because there were parts where I needed a smaller one to fill in space.
These are what they looked like before I deconstructed them:

And the finished product, I am so happy with this one!!

(it is large, don't let the super sized table lamp behind it fool you!!)
Monday, November 25, 2013
Putting up the Christmas Tree!
I know....it's still November. We like to set our tree up on Thanksgiving, but we won't be home for Thanksgiving. By the time we get home it will be into the first week of December, and I just can't wait that long to set up the tree! We already put the girl's trees in their rooms over a week ago! So it seems perfect right now. The one thing I have learned is that when you are a parent, especially to more than one child- time goes SO FAST. Christmas will be here in a blink of an eye so I really like to make the most of my holidays!! Here are a few pics of us decorating. And Patrick is officially fired. There was ONE photo of me taken and it was if the back of my head. Then you wonder why I have to take selfies ;) haha.


H&M Home
I LOVE H&M. One of the biggest bum outs about where I live is that I have to drive two hours to get to one :/ So I was ecstatic when H&M opened their online store. Like DYING ecstatic.
THEN they started selling home decor online and I almost had a heart attack. I am really feeling some of this stuff. The floral curtains….I NEED them.


THEN they started selling home decor online and I almost had a heart attack. I am really feeling some of this stuff. The floral curtains….I NEED them.


I am really leaning towards this for when we switch Priscilla to a big girl bed. I might have to order it soon just to make sure I have it!!


Can't stand the cuteness!
Sunday, November 24, 2013
DIY Bottle Brush Trees
This is my all time new favorite winter/holiday craft. I am actually going to the craft store today to get more trees so that every room has some of these awesomely retro trees in them!!


It's surprisingly easy as well. You can can bottle brush trees at the dollar store, or any craft store. I have purchased them from like five different places, but if you get the 40% off Michaels's coupon, it's best to get the bag, in my opinion.
Once you have your trees, fill a bucket or sink with bleach and water.
Put the trees inside. I let mine in for a few hours until white.
Once they were the color white I wanted, I put gloves on and took them out. I places them onto newspaper on my kitchen table and let them dry over night, this is def a two to three day project.
Once the trees are dry you can now color them the colors of your choice. I left a few white as well.
I used rit petal pink and aqua.
The amount of rit to use depends on what shade you want your trees to be. This took me a few times to perfect. I seemed to like an inch of rit at the bottom of the bucket and the rest filled with water. It doesn't take long to color them, I just kept an eye on them and took them out when they looked the way I wanted them to.
I let them sit overnight and then glittered them the next day.
To glitter them, I used modge podge and a foam paint brush. I started at the top of the tree and just brushed to the bottom, continuing until I had all of the tree modge podges. I then poured glitter all over and let them dry AGAIN overnight ;)
So you need:
-bottle brush trees
- bleach
- bucket or sink
- rit dye
- mode podge
- foam brush
- clear/iridescent or white glitter
- you may also use little ball ornaments to decorate ;)
Good luck!
Glitter houses

Welp, this is what crazy people do right here. I have become completely obsessed with brush bottle trees and glitter houses. Like out of my mind crazy. I just want to keep making more and more and more but I really don't think my house needs anymore deer or trees.... I'll just have to make room then I guess! I can't believe I never knew about coloring the trees until now!? Mind=blown.
This glitter house itself was not made by me. It was made by hobby lobby. I bought just a plain, brown cardboard house and decorated it the way I wanted to so it would match Priscilla's room. I AM however going to make my own. I have had the templates printed out for like a week now, but haven't had the chance to put it all together. I became impatient and just bought an already assembled one... I am glad I did it this way tho, because now I know how to paint them and what's best to use. Because if I took the time to hand craft a house and messed up the paint- there woulda been some DRAMA in this house! Ha!
You can find instructions to make your own "putz" or "glitter house" here:
Or here:
To decorate this house I needed:
- a glue gun
- acrylic paint
- primer (I used white spray paint)
- paint brushes
- a wood platform to glue it all on
- deer
- bottle brush trees (making a how to blog next)
- modge podge
- clear/iridescent glitter
- cotton ball for the smoke
- a fence
- fake snow
- any other decorations you would like ;)
- I also have led lights to put inside. (Optional. But very cute)


Saturday, November 23, 2013
Lilac hair
So I have hair problems. At some point in my 20's I became severely allergic to hair color. Well, an ingridient in hair color called PPD. Every semi or permanent color has it and the trickiest thing is even "all natural" colors and colors that claim "NO ppd" actually have a chemical called toluene 2.5 diamine sulphate which is pretty much the same thing, and most people that are allergic to PPD are also allergic to that. So this leaves me able to use bleach- but no toner. So my hair goddess (Nina Childers the owner of Bella Salon in Chester Springs,Pa) gets my hair justttttt right without a toner. I can also do "fun" colors. Special effects, pravana, manic panic, etc.


But here is the problem: I am DYING to go back to my natural color or a shade or two darker.. Not only have I not been this color in forever but it makes doing fun colors easier because then I can just throw a brown over top when I am finished with the wild color instead of bleaching it out. That is one of the main reasons I haven't done a fun color in a few years (well an all over fun color) bc the thought of ruining my long hair gives me anxiety. Ugh. Girl problems.
But then I thought, hey, I can do a lilac and that would probably fade out really well on bleached hair...
I think this could work. I would of course LOVE to go bright red again, but my husband isn't feeling that. (Even though that was the color it was WHEN WE MET! HOW RUDE!!)
So I think I am going to do it. I haven't had a really wild color in a few years, and it seems to be very socially acceptable these days, haa. I am an OG color gal. People looked at you like they had never seen a human with pink hair before back then!?
Bottom line- I have hair ADD and have had the same hair color for far far too long!!
Friday, November 22, 2013
Best Vegetarian Chili Recipe Ever
OK, so I can't say if it is really THE BEST, but it is my and everyone else in my house's favorite ;)
I remember growing up, my pop pop made the most amazingly bangin' chili. He past a long time ago, and no one but him knew the recipe :/ I have always held a high standard because of this chili. I have been making this recipe for a few years now, changing it up as I went along to make it perfect in my mind. This recipe is vegetarian, using fake grounds (which we only use in some things bc fake meat isn't all that good for you either??!) but you could easily replace the fake grounds for real meat, or just take all meat or meat substitutes out and just add more beans. This is a chunkier chili and I don't always measure every thing but I try and give a close amount if I can :)
You will need:
~ 1 green pepper
~ 1 red pepper
~ 1 onion
~ garlic (I LOVE garlic so I probably use more than most...I would say a normal person would use 3 to 4 cloves??)
~ olive oil
~ 2 cans of black beans
~ 1 can dark kidney beans
~ 1 can light kidney beans
~ 1 bottle of taco sauce
~ bag of fake ground meat (we use Quorn)
~ 2 cans diced chili style tomatoes
~ 1 can stewed tomatoes (or a third diced chili)
~ package of frozen corn
~ cumin (I just dump it in, ha! I would say a tablespoon?)
~ chili seasoning, I use hot mexican (a few tablespoons depending on your taste)
~ salt and pepper if you choose
~saute onion, pepper and garlic in olive oil
~ strain beans and add to crockpot
~ add everything else
~ cook low 10 hours, high 5 to 6
It may look like a lot of ingredients, but you obviously just throw most of them in. I stay away from any recipes that take too long because I really don't have the time for that!!
To serve, I grate colby jack cheese, add sour cream, sometimes sriracha if I am feeling sassy, and avocado. I make this about once a week in the winter months and if I don't make it too spicy, my kids love it too!!
(the cornbread pictured is boxed cornbread!! The horror!! I'm not gonna lie, it IS good, but I am always looking for a decent recipe so if you have one feel free to share!!!)
xo

Thursday, November 21, 2013
Cookie Dough Cupcakes!
Since I haven't updated this blog in an ETERNITY, and some of the posts are way back, I thought I would pull a few to the front again. You know, like the most deliciously amazing ones. Here is one of the best.
Omg. This isn't the first time I have made the delicious cookie dough filled cupcake. It was however, the first time that I decided to make cookie dough truffles and add them to the top as well. So you have the cake with a cookie dough ball stuffed inside, icing, and another cookie dough truffle on top. Heaven. The best part is there are no eggs, so you don't have to worry about getting salmonella and pooping your pants from indulging in the ever so delicious cookie batter! That's a plus!
I don't know how many calories are in this bad boy, and I don't want to know!

(makes 24)
Cupcakes:
- 3 Sticks unsalted butter, room temp
- 1 1/2 cups packed light brown sugar
- 4 large eggs
- 2 2/3 cup flour
- 1 tsp salt
- 1 cup of milk
- 2 tsp vanilla
- 1 cup chocolate chips
Filling/truffles:
- 8 TBL unsalted butter, room temp
- 3/4 cup packed light brown sugar
- 2 1/4 cup flour
- 1 14oz can sweetened condensed milk
- 1 tsp vanilla
- 1/2 cup choc chips
- package of chocolate melts
Frosting:
- 3 sticks unsalted butter
- 3/4 cup packed light brown sugar
- 3 1/2 cup confectioners' sugar
- 1 cup flour
- 3/4 tsp salt
- 3 TBL m765949556
Roll out the balls..I rolled out 24 and put them in the fridge. With the remainder, I made the truffles. Do do so, just melt the chocolate melts, and dip! Once dipped, I added those to the fridge as well and started working on the cake.
Cupcake directions:
Preheat over to 350 F. Line cupcake pans. (makes 24). Combine butter and brown sugar about 3 minutes. Mix in eggs, 1 at a time. Scrape sides of bowl as needed.
Combine the dry ingredients in separate bowl. Add to the butter/sugar mix, alternating with the milk, starting with the dry ingredients and ending with the dry ingredients.
Add vanilla, then fold in chocolate chips.
Add batter to the liners and bake for about 18 minutes. (depending on your over anywhere from 18 to 20)
When finished baking, take out and let cool completely. Once cool, cut a cone shape out of each cupcake and fill whole with a cookie dough ball, and then add the top back to the cupcake. They might look a little weird, but you won't be able to tell once the frosting is on, don't worry!!
Frosting:
Mix butter and brown sugar. Add the confectioners' sugar, the the flour. Add the salt, then milk, then vanilla.


Omg. This isn't the first time I have made the delicious cookie dough filled cupcake. It was however, the first time that I decided to make cookie dough truffles and add them to the top as well. So you have the cake with a cookie dough ball stuffed inside, icing, and another cookie dough truffle on top. Heaven. The best part is there are no eggs, so you don't have to worry about getting salmonella and pooping your pants from indulging in the ever so delicious cookie batter! That's a plus!
I don't know how many calories are in this bad boy, and I don't want to know!

I made the cookie dough filling/truffle balls first because
you have to let them chill before forming the balls because they are so sticky. Oh and another thing I have learned with this recipe is you can fill the cake pretty high in the liner because they don't get all crazy big.
(makes 24)
Cupcakes:
- 3 Sticks unsalted butter, room temp
- 1 1/2 cups packed light brown sugar
- 4 large eggs
- 2 2/3 cup flour
- 1 tsp salt
- 1 cup of milk
- 2 tsp vanilla
- 1 cup chocolate chips
Filling/truffles:
- 8 TBL unsalted butter, room temp
- 3/4 cup packed light brown sugar
- 2 1/4 cup flour
- 1 14oz can sweetened condensed milk
- 1 tsp vanilla
- 1/2 cup choc chips
- package of chocolate melts
Frosting:
- 3 sticks unsalted butter
- 3/4 cup packed light brown sugar
- 3 1/2 cup confectioners' sugar
- 1 cup flour
- 3/4 tsp salt
- 3 TBL m765949556
Filling/truffle directions:
As I stated, I made the dough balls first. Combine butter and sugar and cream until fluffy. Add flour, condensed milk and vanilla. Fold in the chocolate chips.Cover, put in freezer for about 45 minutes.Roll out the balls..I rolled out 24 and put them in the fridge. With the remainder, I made the truffles. Do do so, just melt the chocolate melts, and dip! Once dipped, I added those to the fridge as well and started working on the cake.
Cupcake directions:
Preheat over to 350 F. Line cupcake pans. (makes 24). Combine butter and brown sugar about 3 minutes. Mix in eggs, 1 at a time. Scrape sides of bowl as needed.
Combine the dry ingredients in separate bowl. Add to the butter/sugar mix, alternating with the milk, starting with the dry ingredients and ending with the dry ingredients.
Add vanilla, then fold in chocolate chips.
Add batter to the liners and bake for about 18 minutes. (depending on your over anywhere from 18 to 20)
When finished baking, take out and let cool completely. Once cool, cut a cone shape out of each cupcake and fill whole with a cookie dough ball, and then add the top back to the cupcake. They might look a little weird, but you won't be able to tell once the frosting is on, don't worry!!
Frosting:
Mix butter and brown sugar. Add the confectioners' sugar, the the flour. Add the salt, then milk, then vanilla.


Faux Deer head

If you follow me on instagram, you know this isn't a recent craft of mine. I did this one while pregnant with Priscilla!! And while I shared how I did it on there for those who have asked, and I am sure a lot of people have blogged about the easiness and cheapness of this redo, I figured I would cover it on here. Especially since it's the holidays and I am seriously contemplating doing a Rudolph one for this Christmas!!!
Instead of buying one for $130.00 PLUS, you can just order the head here. Or here.
We have since bought an elephant for Priscilla's room and painted it pink, and later this month are going to by the moose for our living room and paint it gold or bronze.
Once your darling faux deer/moose/lion/whatever you choose head arrives, just prime it with spray paint primer, and spray away with the color of your choice.
Oh the wonders of spray paint.
Winter Wonderland
This project was kind of an accident. While I was in the middle of doing the ballerina mason jar project and realized that they just didn't fit, I had to run out mid craft to a TON of stores. Being creative really is exhausting sometimes!! Sheesh. So I ran to Target to try and find smaller ballerinas, and came across this Barbie princess ornament. I knew Annabella would LOVE it. So then I was thinking of what I could do with it??? I already had the deer that I had purchased earlier in the day, and the silver tree, modge podge, fake snow AND the nutcracker ornament. All I needed was to cart my butt back to Michael's and get a piece of wood and some silver paint.

So I came home with the ornament, showed Annabella, and of course she was ecstatic. I painted the wood with silver acrylic paint (I used cheap acyrlic that cost about $1.00). I also painted the three deer silver (spray paint would work as well).
When the paint dried on the wood (about thirty minutes), I glued the trees and the nutcracker on.
I then modge podged the entire top of the wood and threw a combo of flat white fake snow and iridescent on top. I also modge podged the deer and sprinkled them with glitter. (the deer took a little longer just because you have to wait for a side to dry, then flip to do the other side)
I never actually attached the Barbie princess, as it was Annabella's request not to. I didn't understand why at the time, I just went along with it, but every day after school she has been going to her room, and getting all of her princess figurines and having them play with the "magical snow princess" in her "winter wonderland" as AB puts it. It is pretty stinking cute, I must say!
You need the following for this:
~ wood (or any platform, but the wood is magical)
~ acrylic paint OR spray paint
~ trees
~ craft snow
~ modge podge (man I love saying that)
~ glitter
~ glue gun
~ anything else you want to decorate with. Deer, princesses, snowmen, gnomes, really anything magical.
As you can see, I never removed the tops of the ornaments, it doesn't bother me right now, but I will probably remove them at some point!!!
As you can see, I never removed the tops of the ornaments, it doesn't bother me right now, but I will probably remove them at some point!!!
These little scenes are really working their way up to being my new favorite craft!!!!

Wednesday, November 20, 2013
Magical wintery tree mason jars
This craft is SO EASY. Even the most non crafty person can do this one I swear! It's actually so easy that I feel dumb writing instructions, but I will anyway!
You will need:
Bottle brush trees (michaels, acmoore, hobby lobby, amazon.com, even dollar stores have them)
Mason jars
Fake snow
Glue gun.
All you need to do is glue the tree, stick it in, wait for it to dry, add snow and put the lid on and find somewhere special to put them!! That's IT!!
You can put the tree in this way, or even glue it to the inside of the lid too. That also looks nice.
I added regular fake snow and iridescent!
Stay tuned because I am currently in the middle of coloring bottle brush trees pastel colors!! It's gonna be fun!!

Magical ballerina jars
The other day we decided to make magical ballerina snow globes. Like pretty much every person on the planet, I also LOVE to put mason jars to good use. This was such a simple simple craft. Well, kind of, after I ironed out some issues.
You need:
~Mason jars. (I used a few different sizes, and you also want smooth jars, or as smooth as possible, meaning no raised name brand in the glass)
~distilled water
~drops of glycerin (I did not use this, but I should have)
~iridescent snow flakes
~glitter
~glue gun
~ballerinas or anything magical you want to put inside
It’s really this simple, glue whatever magical decoration you want to the lid of the jar. Fill the jar almost all the way with water, add drops of glycerin, glitter and flakes. Close, and shake!
I have read before that some people’s jars leak, mine didn’t. If yours do, you may want to seal the lid.
Problems I ran into were: I bought ballerinas whose dresses were too large to fit in the mouth of the jar. That was a problem I didn’t even thing of and because of that I had to run out in the MIDDLE of crafting to SIX different stores to find a ballerina with a fabric dress and then a larger mouth jar for the large ballerinas I already bought.
Go easy on the glitter and flakes. I know, it’s hard. Glitter and iridescent flakes DO make everything more magical, but trust me, the first one we made was a HOT MESS. The HOTTEST MESS EVER> Don’t do it!!
You can also use baby food jars. Perfect for smaller kids. The other jar pictured does not actually have water, and it is still pretty magical. We plan on making a bunch more, some with water, some without :)
Good luck!


Subscribe to:
Posts (Atom)