navbar

Image Map

Wednesday, February 12, 2014

Chipotle Bowl


 I am so so so excited about this one! We DO have a Chipotle here, the problem is whenever I am thinking about how much I want to eat it I am alone with two kids and it's on the other side of town. No, we don't live in a huge town with tons of traffic but when you are hungry with two small kids, the LAST thing you want to do is drive with said children. When I am hungry I am grumpy. The thought of me being grumpy, with two kids that could also get grumpy at anytime while waiting line to eat is a nightmare for me...sooo, yeah, the only thing I eat there are the bowls. So I am thinking to myself, ummm, it's not that intense, just buy the same stuff and make your own!

I make the vegetarian bowl and I use:

-Cilantro Lime Rice (I used archer farms from target)
-Pinto Beans
-Black Beans
-Pico de gallo
-Shredded cheese
-Sour Cream
-Lettuce
-Corn
-Guacamole
-Scallion

 If you want to make your own cilantro/lime rice, be my guest!!! Here is a recipe. I had every intention of doing so until I saw that heavenly box at Target. While we are on topic, if you want to get all zany and make your own pico de gallo, go ahead!! Here is a recipe for that! I chose to just buy it organic and fresh from the food store this time!!

The directions are super super easy, you pretty much just heat it up and throw it together.


-Start by cooking rice
-Strain,rinse and warm the canned beans
-Cook your corn (I use frozen corn)
-While the rice is cooking and the beans are warming start chopping your lettuce and scallions.
-At this point I make a quick guacamole. The guacamole I make for this isn't my super fancy guac. For this I just mash an avocado, add a clove or two of garlic, a few pieces of onion,cilantro and a squeeze of lime. You can use this quick one or make your own favorite recipe!
-And that's about it! Add your rice,beans,pico de gallo,corn,lettuce,sour cream,shredded cheese,guacamole and scallions!

I always enjoy it with a Mexican Coke and tortilla chips of course!

Last Valentine's Day

Just some cute pics I found on my Instagram from last year!! I love love love Valentine's Day <3


This Valentine's Day box was everything. It came back from school demolished but it went to school cute!! 


Tuesday, February 11, 2014

Mustache You To Be Mine


 Back to me procrastinating on Valentine's Day….last Vday, we started our Valentine's almost three weeks early. Mostly because of Annabella's attention span, we would do a couple a day but also because I like to get stuff done! This year just rushed over here! So here is a last minute homemade card idea for any of you procrastinating, busy moms.
 I had to do over 20, and it didn't take a lot of time at all!

You need:
Cards/envelopes
Card Stock
Mustache punch/or stencil
Popsicle sticks
Glue gun
Paint pen/sharpies/stamps/sticker letters
Razor blade

I bought some of the cards at Michael's and some in the dollar section at Target. When I first started this I was going to use a stencil. You can just google stencil and go from there. Then I saw a mustache punch in the scrapbooking isle at Target and snatched that bad boy up! (it saved me soooooo much time!) I used glitter card stock. It's my favorite. It's thick and who doesn't love glitter! I bought turquoise,purple,black,red and pink so they could be for girls or boys. I had planned on stamping the "you a ?" part, but the cards were too glossy and the ink wouldn't dry right, so I just used a sharpie and wrote it on. The inside I used a "be mine" stamp from Michael's. You could hand write any of this, use stamps, or foam letters.

-I started by opening the card and slicing two small slits into the front of the cards.

-I then punched all of the mustache's out.
-Put a dot of hot glue at the top of the popsicle stick and attached the mustache's.
-When that is dry, insert the popsicle sticks into the slits.
-At this point you can really do what you want. Again, I did the "be mine"stamp inside and added some stickers, then had Annabella sign her name at the bottom of them!!
-Put cards inside of the envelopes and then let your little one draw pictures on the envelopes and add Valentine's Day stickers.


Urbanwalls Giveaway

Urbanwalls and I have teamed up for a giveaway!!! Head over to Instagram and join in the fun!!

Good luck!!!

Monday, February 10, 2014

Heart Paint Chip Canvas


 Wow, the past two weeks have been something over here!! I had all sorts of fun Valentine's Day crafts and treats that I wanted to blog well before the week OF Valentine's Day. Between us having a bat in the house for a few days…yeah, a BAT and then me not feeling well for a few days, Valentine's Day crafts had to be put on hold. Now that I am feeling better I am frantically trying to finish all of the things I had planned!
 I ripped this one right off of Pinterest. It is a pretty popular one, so if you have already done this craft, I understand! But it is just too cute! It has been reblogged so many times I cannot seem to find the original poster to link. So, sorry about that!
 It is an incredibly easy AND cheap craft because the paint chips are free. You should have seen me at Home Depot with the biggest stack of paint chips known to man. I actually felt guilty, so I mentioned to an employee that I had a craft to do because I felt like a criminal taking so many! Haha!

You need:
-Lots of paint chips
-Foam Mounting Dots (I ised 3 1/2 pkgs)
-Canvas (I used 11x14)
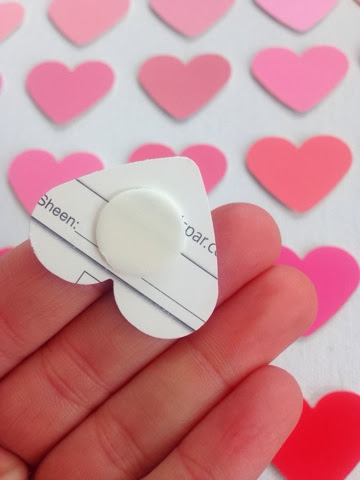
-Heart Punch

-Start by punching the paint chip hearts.
-Arrange the hearts on canvas from light to dark before adding the sticky foam mount. This is where the perfectionist in me had a REAL problem. In my mind it was going to be the most perfect ombre you have ever seen. In reality, I had taken so many paint chips that the tones were not quite the "perfect" ombre but I ended up liking it in the end!
-Once you have the color scheme you like, start adding the foam mounting dots to the back of the hearts and attach.


-That's it!! Quick, easy and cheap crafting right here!


Thursday, February 6, 2014

Urbanwalls Decals

 I was super excited for my mail day yesterday!! I ended up picking the flower decal for my bedroom. I REALLY wanted the heart decals, I am not going to lie….but, we have a ton of heart stuff going on around here. I also really wanted a decal for Annabella's room, but her walls are awkward. We are moving in a few months, so I will definitely get them for the girl's new room!!! Eek!!

I have these decals.


Check our some of there other designs on their Etsy store!

Here are some of my favorites:


Monday, February 3, 2014

Quinoa Patties


 So, my picture is not doing these patties justice. AT ALL. The thing here in Erie, is that the ball of light in the sky is not always around and cooperating on the days I want to blog ;)
 Last time we went to visit my family in Austin, my sister made these and they are so so so good! You know something is good when every single person in the house will eat them!! I usually prepare them over spinach lettuce with a poached or fried egg. You can also put them in a roll and eat as a delicious "burger", and honestly, I just eat them plain sometimes!!


Ingredients:
*2 1/2 cups of quinoa (cooked as directed on package)
*4 beaten eggs
*1/2 cup chopped chives
*1 chopped onion
*1/2 tsp sea salt
*1/2 cup grated Gruyere cheese
*3 to 4 cloves of garlic
*1 cup panko
*extra virgin olive oil


Directions:
-Cook quinoa as directed on package and cool.
-Combine the quinoa, eggs, salt, onion,chives,garlic and cheese.
-Add the panko
(I usually refrigerate for about 15 minutes so they firm up a bit)
-Form mixture in patties about an inch or so thick
-Heat oil in pan and add patties.
-Heat each side until brown (about 5 to 10 minutes depending on heat)

If mixture is too wet, add more panko.

I usually get about ten patties out of this. And I also add a bit more cheese because I love me some cheese :)